
Home decoration construction decoration friends are most concerned about the quality of home improvement can be guaranteed. On-site construction sites can directly reflect the quality of home improvement. In particular, the details concerning the quality of home improvement can be demonstrated on the site. Carefully reviewing these links can not only inspect the construction quality of the workers, but also can be found in the home improvement process. Problems before they occur. The following small series introduces home improvement construction process.
One: What you need to do before starting work
1. Whether knocking walls on the ground is empty, such as emptying drums, requiring developers to eliminate redo;
2, kitchen, bathroom, balcony, terrace to do water-closing experiments, such as leaking to supervise the developer to rectify;
3. Connect the hot and cold water pipes, open the main valve and open the plugs one by one to see if the water passes through;
4, to protect all finished products (such as security doors, video phone doorbell, finished kitchen, gas meters, etc.) protection;
5, carefully check the strong and weak circuit is smooth, floor drain, water is fluent;
6, carefully check the wall beam column is skewed and so on.
Two: transformation of the wall
1, first use the cutting machine to cut the part to be removed and then hit, do not use a sledgehammer, so as not to affect the wall of the wall that is not removed;
2, first use a hammer to drill the bottom and then slowly upward play. The doorway of Xinyi's doorway should be beamed;
3, can not play part: bearing wall, concrete wall.
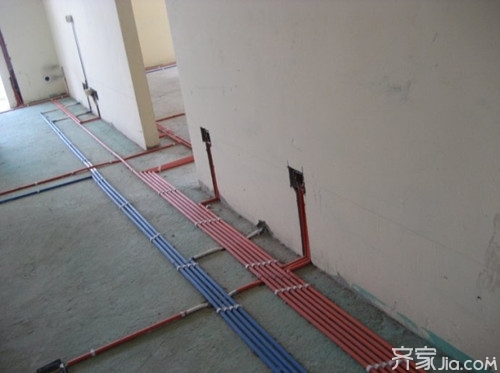
Three: Water production process
1. The depth of the hot and cold water pipes buried in the wall shall be 1cm between the wall of the pipe and the wall skin, strictly follow the principle of left hot right and cold;
2, the outlet must be strictly in accordance with the national standard spacing of the size of the layout, the internal and external wires to distinguish;
3, no clogging, connecting hot and cold water pipe pressure test pump pressure 0.8mpa above no explosion, risk, drip, leak. Unpressurized test cannot be wall-sealed;
4, after the tile is tiled, the hot and cold water inside the wire elbow can not stand brick surface;
5, after the water pressure test, open the main valve and open the plug one by one to see if the plug is blocked;
6. Draw accurate pipe layouts and submit them to the owner for preservation (preferably photos of the construction part can be saved).
Four: Electric production process
1, Guiji air conditioning walk 4 square separate circuit, the kitchen, bathroom, each walk 4 square loop one, lighting a 2.5 square circuit, ordinary socket to go 1-2 2.5 square circuit, do not use 1.5 square wire;
2. The distance between strong and weak electricity is more than 30cm, and the distance between strong electric pipe and heating pipe (piece), hot water pipe and gas pipe should be greater than 30cm;
3, the same room power, telephone, television and other outlets should be at the same level elevation (except for special circumstances), strictly follow the principle of the left zero right fire line in the ground, the best use of the national standard ground wire yellow-green line;
4, into the box line with locking protection, line box laying to be flat, do not elbow, bends to bending or bending treatment, take over the use of pvc glue welding. Strictly follow the principle of threading after the first pipe is buried. The place where the pipe cannot be buried at the top should be protected by the square pipe, and the naked bare wire and the ceiling wire must be fixed;
5, weak current can not have connectors (TV line to use divider), network cable is strictly prohibited;
6. The tube should be protected by the electric tube. When the three sets of wires enter the same box, another wire box must be provided. Lamps in the ceiling should be reserved
7. When the circuit project is completed, use electric light bulbs to test whether all sockets and light lines are powered on. Both strong and weak power should be carefully tested, and if the draw is a live line, it is forbidden to proceed to the next process;
8, after the acceptance to draw a precise circuit diagram to pay the owner to save (preferably to take pictures to save).
Five: waterproof and moisture-proof production process
1. Clean the wall surface where waterproofing is required;
2, the surface of the waterproof coating brushing tightly two times, there are places where the pipe to be rolled up 20cm;
3, After drying for two days, put the water pipe and floor drain plugging tightly, put on 5-8cm deep water for 48 hours of closed water experiment, ensure that there is no leakage in the upstairs and downstairs can be paved with the floor tile, do not do the closed water test is strictly prohibited Brick;}
4, the wall brush moisture-proof coating again, the best height of 1.5 - 1.8m above, brushing should be tight;
5. The door and window cover and wood products shall be damp-proofed against the wall to prevent the occurrence of mildew and blackness in the event of subsequent exposure to moisture. During the production, the tung oil shall be evenly painted on the wall and the floor of the wood board.
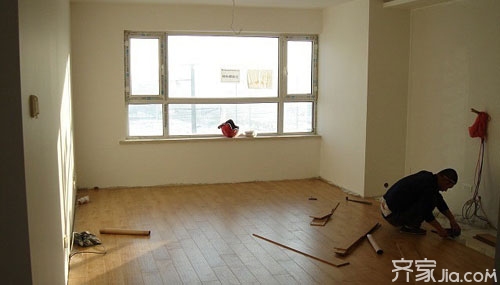
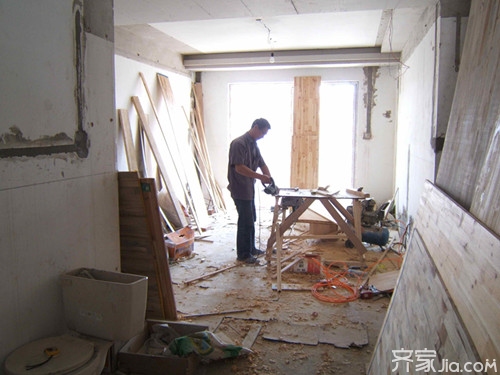
Six: woodworking production process (preconditions)
After the original door frame is to be demolished, the door frame shall be re-opened. The broken wall shall be first made of wood powder and shall be dried and then be used as wood products. Before the door and window cover is wrapped, the original wall surface of the door and window cover shall be treated with strict moisture-proof treatment to avoid wood products. The paint peels off due to damp mold.
Seven: Door and window cover manufacturing process
1. The woodworking master hits the standing board and solid wood lines with an impact hammer to fix the eye. The wooden wedge is allowed to dry in the sun for one day. After the anticorrosive treatment, the nail is inserted into the already opened eye. When the cover is set, the wood is brushed against the wall and the tung oil is made again. Moisture treatment
2. Put a high-quality joinery board against the wall and brush the tung oil and then screw it into the wall. Use a level ruler and a wire camel to hold it horizontally, vertically, and squarely. The board is filled as tightly as possible. The edge of the blockboard station is sufficient to withstand the weight of the door leaf and the nail holding force of the hinge, and the door stop is made with a nine-percent board to make the dark side mouth, and the small wooden line head;
3, the door line with nine PCT board bottom, the side with solid wood small lines sealed, solid wood door lines and other solid wood lines should be purchased 4-5 days in advance, do not open the bundle on the site to dry, and the surrounding air integration, Nail windows and doors must be artificially set aside more than 1 mm of contraction, must not immediately close. Normally (Summer) shrinks more than 3 days, (Winter) shrinks more than 6 days and then closes again;
4, kitchen, bathroom door line and ground to set aside 1 cm spacing, so as not to pull the ground;
5. It is forbidden to use wood for windowsills. It is recommended to use natural stone, artificial stone, tiles, mosaics, etc.;
6. The production of window cover wood should be made after the natural stone or artificial stone is installed, so as to achieve a tight seam;
7. Wood products that need to be mixed with oil should be treated with "v" grooves in the solid wood lines and contact areas.
Eight: door leaf production process
1. Flat door production: use two high-quality blockboards to form solid doors, and open the board to the corresponding slots with a depth of 3mm and a spacing of 12cm. Use woodworking glue to open the corresponding slots. The wood boards were laminated together, and the panels were decorated on both sides. The weight was more than 500 pounds on a flat surface for more than 10 days. During the pressing process, the front and back sides were flipped 3-4 times. After 10 days, the door blank was closed with solid wood lines. Solid wood lines must not be closed immediately after closing. Normally (Summer) shrinks more than 3 days, (Winter) shrinks more than 6 days and then closes again;
2, bump process door production: the middle with a high quality blockboard open (ibid.) corresponding slot, both sides of 9-12 PCT clip system, on both sides of the decorative panel, on the flat surface of 500 kg or more weight to suppress 10 days Above, during the pressing process, the front and back sides are flipped 3-4 times. After 10 days, the door blank is closed with solid wood lines. (Dry-shrinking process as above);
3, wardrobe door production process: the middle with 12-15 PCT board, 15 PCT must open the corresponding slot, on both sides of the decorative panel, where to reach the length of 140 cm above the door to be placed in the door on both sides of a stainless steel bar, put On the flat ground, more than 500 kilograms of weight is pressed for more than 10 days. During the pressing process, the front and back sides are flipped 3-4 times. After 10 days, the door blank is closed with solid wood lines. (Dry-shrinking process as above) The door width should not exceed 45 cm;
4, sliding door production process: work and other leaves almost the same, the track should be hidden in the door cover, both sides of the glass to use custom-made solid wood small clips, the ground positioner to be solid, the location should be reasonable.
Nine: no door wardrobe production
1, wood board frame, backplane nine PCT board, such as the use of Boeing film first backplane Boeing film affixed before nailing, when the vertical board and the cross-board affixed to the soundtrack to man-made outward mouth curled edge 3 - 4 mm, and then use a small line of solid wood to suppress the mouth to avoid warping. When working, pay attention to the sliding door to prevent the internal drawer from opening. (Note: The wardrobe interior can use Boeing film, mixed water paint, veneer, etc.);
2, the size of the drawer should be strictly in accordance with the size of the sliding door, the upper drawer and the drawer plate should be closed with a small solid wood (dry reduction process ibid), pants can not be higher than 1 meter;
3, the distance between the vertical boards can not exceed 1 meter, if more than 1 meter, it is necessary to add a vertical board, in order to avoid playing a long time pocket.
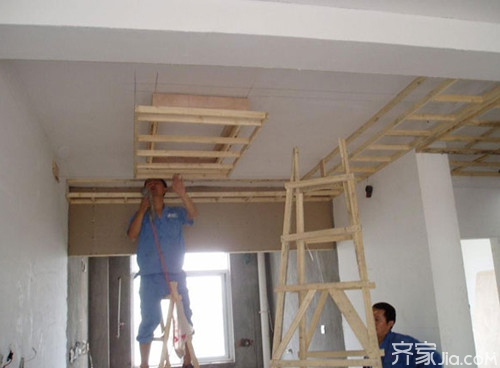
Ten: ceiling production process
1. Use the horizontal tube to find the horizontal point and use the ink fountain to horizontally stretch the horizontal line;
2. Light steel keel: wood keel is used as side dragon, lamp trough position is made of wood joist or wood board, wood fireproof paint is applied at the place where the wood is made, keel is at least 50 or more, spacing is 30 centimeters, pitch is 60-80 centimeters. It is advisable that between the gypsum board and the board, artificially set aside 5-8 mm gaps, and gypsum board surface self-tapping screws inset 1-2 mm and do anti-embroidering treatment to achieve smooth and firm, special shape to achieve smooth lines;
3, wooden keel: keel minimum 3 * 4 or more, spacing 30 centimeters is appropriate, hanger spacing 60-80 centimeters is appropriate, it is strictly forbidden to use wooden wedge-shaped nail directly to the top of the lifting bar, brush tight fire retardant paint until the invisible wooden keel color After the first layer of keel is covered with a layer of full-length willow core and then the gypsum board is put on the gypsum board, a space of 5-8 mm shall be reserved between the gypsum board and the board, and the self-tapping screw of the gypsum board shall be indented by 1-mm. Embroidery treatment, to be flat and firm, shaped to achieve smooth lines;
4. Aluminum buckle: Strictly require the level of operation, horizontal line, light steel keel teeth should be aligned, keel spacing within 50, hanger spacing 60-80 centimeters is appropriate, the upper hand when the board should be light, so as not to press the board out In the pit, the contact between the edge strips and the tiles is not strictly sealed with sealant;
5. Aluminium-plastic panel: Wooden keel should be at least 3*4 or more, spacing should be 30 centimeters, hanger spacing should be 60-80 centimeters, fire-retardant paint must be applied to the surface, and the keel should be covered with a layer of full-length willow core after 9 hours. Paste aluminum-plastic composite plate with all-purpose adhesive, between the aluminum-plastic composite plate and the plate to be artificially reserved 3-4 mm gap, has been prepared to fill other colors to play the sub-grid effect, to be flat and firm, special-shaped to achieve smooth lines , The corners of the folded surface should be sleek and not broken or shiny.
Eleven: Deck Wall Manufacturing Process
1. Suggestions for using brick walls should be made of bricks as far as possible (not more than 30 cm above or away from the beam);
2. The proposal that can not reach this condition is made of light steel keel. The specification of the main keel must be above 110. The solid dragon, the dragon and the main dragon and the clip must be installed firmly. The fixing point must be riveted, and the middle noise must be used. The cotton should be fixed with lead wire or copper wire. Between the gypsum board and the board, artificially set a gap of 5-8 mm. The gypsum board surface should be 1-2 mm from the tapping screw and do anti-embroidering. Shaped to achieve smooth lines, there are large materials to be reinforced at the door;
3, is strictly prohibited using wood keel
Twelve: paint production (water paint)
1. Clean the construction site and remove all the tools and materials except the benches and ladders. The paint must be completed before the latex paint;
2. The hardware such as door locks and hinges should be protected; if there is a need for color change, they should be separated by color separation paper;
3, nail holes with oil putty (do not use transparent wool), especially rough decorative panels (black walnuts, teak, oak, etc.) to be full of putty again, dry and then grinding 280 water sandpaper again;
4. Apply primer 2 times and dry 400 water sandpaper again;
5, and then two times on the primer, dry with water mill No. 600 water sandpaper again;
6, then paint it again, after drying with water mill 1000 water sandpaper again;
7, then paint it again, after drying with Shuimo 1200 water sandpaper again;
8, then paint it again, after drying with a fine cotton yarn polishing again, strictly prohibited;
9, the above work must be closed tight doors and windows, clean the ground at any time, the paint needs a clean environment, otherwise it is difficult to do a good job
Thirteen: paint production (mixed water paint)
1. Wood products with solid wood lines are used to open the “v†slot between the line and the panel when the carpenter works. The painter must fill the “v†slot with putty or self-adjusting putty so that cracking does not occur. With obvious traces of lines, the woodwork looks like a whole;
2. Putty with 2-3 times with putty or self-adjusting putty, it is recommended not to use putty, plastic putty is very likely;
3. The following procedure is the same as that of clear water paint.
Fourteen: paint production (mixed water clear)
1, using the toner color, then paint with water;
2. The color concentrate is directly sprayed into the varnish.
15: Latex paint production process
1. Clean the site and brush the construction glue again and again;
2, with ink fountain pop-up yin-yang angle line, with gypsum powder or white cement along the ink line to make yin and yang angle;
3. The cement wool wall should be covered with pure white cement. The white walls that the developer has already dealt with must be eradicated severely. After the eradication of the white cement, the white wall should be putty cement or self-adjusting putty. Put on the first pass;
4. After the first time putty is dry, put the finished putty on the floor twice.
5, the third pass is also used to put the finished putty (reminder: as the case may be, as long as the flat can be, putty is too thick but not good, too thick place should not use finished putty, gypsum powder or white cement);
6, with 100-200 watt bulb side polished 600 water sandpaper;
7, on the anti-alkaline primer again and again to be dry (preferably to scrape the primer);
Editor's summary: The process of home improvement construction is introduced here. I hope to help everyone. If you want to know more related information, you can pay attention to this website information.
Home improvement home decoration design
Stainless Steal CNC Milling Parts
Stainless Steal Cnc Milling Parts,Aluminum Parts Cnc Machining,Metal Cnc Machining,Luninum Cnc Machining
JIANGSU TONGDE INTERNATIONAL TRADE CO.LTD. , https://www.tongdetrades.com